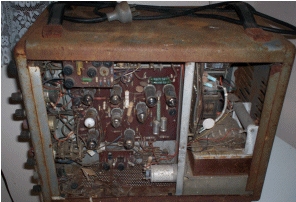
I bought a late 1960's early 1970's Dartronic 415 Oscilliscope on ebay for $19.98 It is a hybrid containg both Valves (tubes) and very early metal can and glass transistors as well as point to point wiring with circuit boards. It's in a very sorry state as it has been sitting on the floor in a shed with no side panels on it and has been exposed to some moisture at some point in its life.
I have not even turned it on, as it contains 5 very large wax paper electrolytic capcitors. These have a tendency to leak and fail over time and 40+ years is certainly enough time for that.
Man it was a nightmare IDing some of the valves. I had to put a lot of them in the freezer as the condensation sticks to the glass better where the ink was, doesnt always work but worth a try. Some of them I had to compare physcially with other valves looking for a match.
As my next door neighbour said to me last night "your in for a world of hurt"
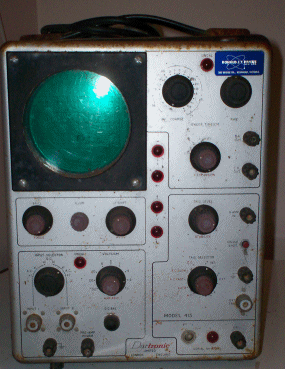
My plan of attack is to try and restore it to working condition to become one of the centre pieces for the old valve workshop I am setting up, all the "modern" stuff will be hidden in cupboards with all vintage valve test equipment out on the bench. I really would like the old valve test gear to be functional not just static display items.

Anyway back to the scope, and a list of things that I need to do, that I already know of, as well as the things I have already done last night.
1. Clean out the "live" bugs, leaves, webs and assorted other things from the shed. (done)
2. Clean off rust and repaint in grey hammer tone (original colour)
3. Identify and replace all the wax paper caps.
4. Resolder all the conections as I have had two wires break off already.
5. Check all the voltage outputs from the transformer and identify the Hight tension (250 volts+) and also the heater filiment voltage which should be 6.3v
6. Check all the voltages at the sockets of the valves with them removed and make sure they are within the range for the valve.
7. ID valves (done)
8. Check all the valves for short circuits (means I will have to build a valve short circuit tester)
9. Get a clear perpex cover made for the sides and top to "show off" the valves
10. Remove and scan front panel ready for painting with silver paint (original coulour) not hammer tone.
11. Have silk screen's made for the red and black writing on the face plate as some of it is fading so I will touch it up in paintshop first.
12. Relabel all the valves as the writing is coming off them.
13. Add white LED to internal chassis to light up the inside (not to much as I want to see the heaters glowing in the valves)
Its going to be a long term project but so far it has all been going pretty well and it appears that only one valve has leaked as all the other ones have nice bright silver "get"